Logical, visual, sane, organization for turning small things into extremely powerful solutions.
Creative directors, customers, players, and everyone else in the world will ask for changes. Changes that were never part of the original plan. Changes that change a lot; the order of things, the addition of a whole new thing that now needs to happen right in the middle of the thing you just finished making. Even before the changes start rolling in, just the task of creating a system that does exactly what you want can be daunting.
Turning big problems into small tasks is how you make strong, bug-free, manageable masterpieces that are flexible to change, resistant to unexpected behavior and built to last. State machines are simple: break tasks up into small, isolated, steps and then run or display one at a time. That long class you built that does WAY too much... should probably be a state machine. Building even a small task with a state machine can lead to a powerful solution that is easy to manage. I’ll say it one more time: use state machines or make your life difficult -- your call.
What is a "State Machine"?
A "State Machine" or “Finite State Machine" or “FSM” has an overly official, daunting and frightening name for what it actually is. I ran away from these suckers for years because I never thought I could understand (or even needed to understand) a whole “machine” to program and get things done. A state machine is just a way of only having one thing out of a group of things “on” or “running” at a time. That’s it. There is ZERO magic going on here. However, once digested, this simplicity will unlock more power, organization and stress relief than you ever thought possible. Say "goodbye” to a massive amount of bugs and say “hello” to: easier challenges, easier delegation of tasks, and easier teamwork.
Set up
State machines in Surge are built in 2 steps:
- Add a StateMachine component to a GameObject.
- Add child GameObjects.
That’s it. I swear.
State machines in Surge simply turn on only one state (child GameObject) at a time as requested. This means you can work like normal in Unity without any crazy new techniques to figure out. Let’s set up a state machine of shapes...
You might notice that adding StateMachine to a GameObject also adds an Initialization component. Surge uses this Initialization component to set things up and ensure it is running properly. You never need to touch the Initialization component but don’t forget to also remove it if you decide to remove StateMachine.
State machines in Surge offer a nice “remote control” feature in their inspector that turns on at run time. This allows for easier debugging and testing as you go. Need to quickly jump to the “Game Over” logic without playing through your game for the one millionth time - there’s a remote for that.
Although state machines can also run just code on each of their states If you are working on a state machine that has visual content, like our “Shapes” example, things can get messy and start to overlap quickly. To solve this you can simply add a State component to your states and then leverage the “solo” button for easier editing.
Enter and Exit
Adding code to your states truly unlocks the power of a state machine. Most traditional programming state machines utilize the idea of an “enter" and “exit" method that are used exactly how they sound: “enter” runs when a state begins and “exit” runs just before a state ends. This approach is awesome for setting things up however a state wants them and then, optionally, putting things back when it is done or anything else that is required. Rather than creating a complex, and custom way of adding this functionality, Surge’s state machine is built to leverage the existing OnEnable and OnDisable methods that Unity’s Monobehavior already uses.
using UnityEngine;
using Pixelplacement;

public class TitleScreenLogic : State
{
	public GameObject titleScreenVisuals;
	public AudioSource titleScreenMusic;

	void OnEnable ()
	{
		titleScreenVisuals.SetActive (true);
		titleScreenMusic.Play ();
	}

	void OnDisable ()
	{
		titleScreenVisuals.SetActive (false);
		titleScreenMusic.Stop ();
	}

	void Update ()
	{
		if (Input.GetKeyDown (KeyCode.Space))
		{
			ChangeState ("LevelSelect");
		}
	}
}
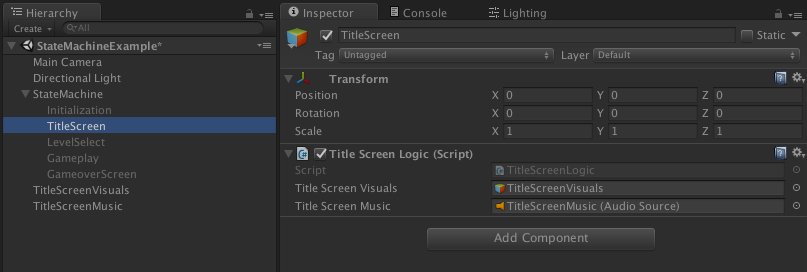
In the above example you will see that when we enter the “TitleScreen” state it will turn on some visuals and play some music. Then if the player presses the Space key this state will clean up what audio and visuals it presented and then change state to the “LevelSelect” state. Did a lightbulb just go off for you? Building your projects like this makes something like a title screen a small and easily managed thing. It should be clear now that the title screen, level select, gameplay and gameover parts of this project can all be worked on individually with this approach. In fact, we could easily add an intro state that, when finished animating, simply changed state to the title screen without having to change anything else in our project. Now did that lightbulb go off?
Options
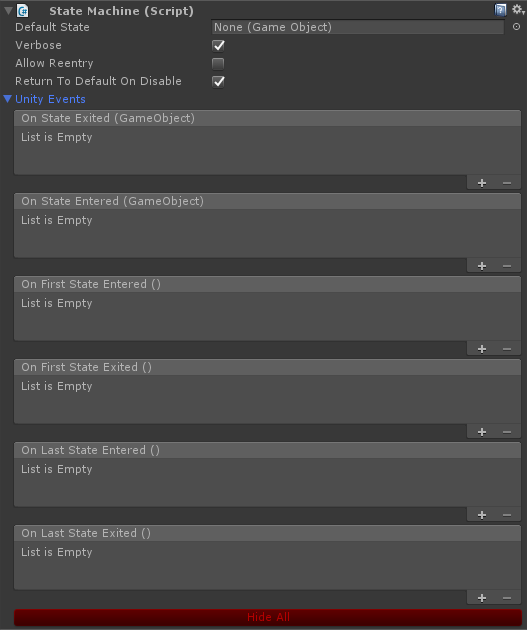
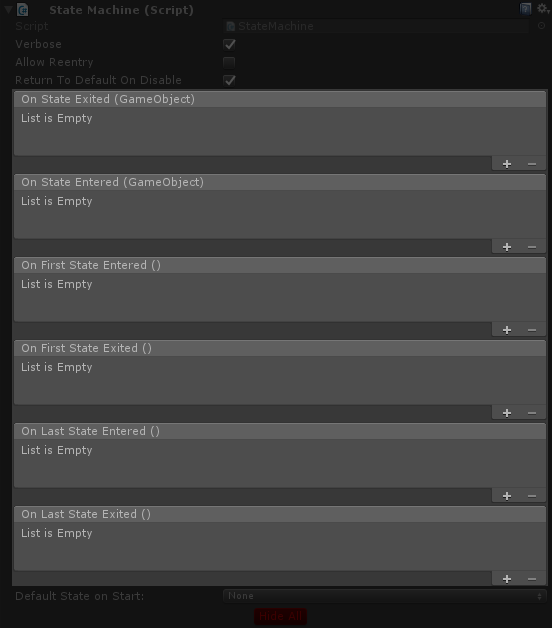
Surge’s state machine solution has a few options that can be set for gaining precise control over things:
- “Verbose” will disable or enable log messages in the console that alert when a state is entered and exited. This log information is invaluable for understanding what went wrong and is ideal for evaluating the overall sequence of a project.
- “Allow Reentry” will prevent logic from re-running. This flag is perfect for avoiding bugs where a user has complete control over when a state machine transitions states. For example, if a menu of buttons changed a state machine that played a song on state entry you can avoid restarting the music if a user presses a button for the state they are already in.
- “Return To Default On Disable” If you have a state machine that handles a sequential set of states such as a questionnaire or set of puzzles this option will reset the state machine to its default state after it is exited. This also comes in handy for sub-state machine that turn off and on when their parent state is entered.
- “Default State” will jump to a specific state when the state machine starts. This is perfect for skipping past parts of a project for easier debugging and testing as well as for simply deciding where an application begins.
- “Unity Events” contains a collection of powerful events that can be hooked into in the inspector itself or through Unity's UnityEvent system in code.
- The “Hide All” button is perfect for state machines that contain visuals. Pressing this in the editor makes for a cleaner editing canvas by disabling all states.
Changing state
Surge’s state machines offer multiple ways for changing state. When you tell a state machine or a state to change state you either provide a reference to the next state itself or, preferably, you can provide just the name of the GameObject in the hierarchy. In addition, state machines can also be told to go their “next” and “previous” states which changes to the appropriate state as things are organized in Unity’s hierarchy.
You can control a reference to a state machine:
using UnityEngine;
using Pixelplacement;

public class StateMachineExample : MonoBehaviour
{
	public StateMachine myStateMachine;

	void OnGUI ()
	{
		if (GUILayout.Button ("Title Screen"))
		{
			myStateMachine.ChangeState ("TitleScreen");
		}

		if (GUILayout.Button ("Play Game"))
		{
			myStateMachine.ChangeState ("Gameplay");
		}

		if (GUILayout.Button ("Quit Game"))
		{
			myStateMachine.ChangeState ("GameOver");
		}

		if (GUILayout.Button ("Previous"))
		{
			myStateMachine.Previous ();
		}

		if (GUILayout.Button ("Quit Game"))
		{
			myStateMachine.Next ();
		}
	}
}
You can have a state itself change states:
using UnityEngine;
using Pixelplacement;

public class StateExample : State
{
	void OnGUI ()
	{
		if (GUILayout.Button ("Next"))
		{
			Next ();
		}
	}
}
You can even extend the state machine class and give a state machine control over itself:
using UnityEngine;
using Pixelplacement;

public class StateMachineExample : StateMachine
{
	void OnGUI ()
	{
		if (GUILayout.Button ("Title Screen"))
		{
			ChangeState ("TitleScreen");
		}

		if (GUILayout.Button ("Play Game"))
		{
			ChangeState ("Gameplay");
		}

		if (GUILayout.Button ("Quit Game"))
		{
			ChangeState ("GameOver");
		}

		if (GUILayout.Button ("Previous"))
		{
			Previous ();
		}

		if (GUILayout.Button ("Quit Game"))
		{
			Next ();
		}
	}
}
When?
I bet you are now asking yourself: “When should I use a state machine?” The answer is: “Almost always.” Seriously. It is almost difficult to find a reason not to use a state machine. If you made a flow chart, then break it into a state machine. If your character has pickups that add powers, then use a state machine to change his visuals and make those power-ups do their thing. If you are making a questionnaire, then each question can be a state. If you have a menu system, then put each screen into a state. If you have a character customizer, then add a state machine holding helmet models, a state machine holding weapon models, and a state machine holding shield models.
StateMachine.cs
StateMachine is the overarching system for creating and using state machines in Surge. When added to a GameObject this component leverages all direct child GameObjects to be used as states and provides the ability to change and exit states. This class can, optionally, be extended to create custom StateMachines that build upon the default offerings.
Next
Changes to the next state, if possible, in the StateMachine. Order is determined by placement in the hierarchy.
Example: Change a StateMachine to the next state every time the right arrow key is pressed. When we enter the last State (which in this example is named “Large”) log a message. It is not required to set this method to a variable and is only shown here to expand upon the functionality of this method. Calling myStateMachine.Next () works just fine.
using UnityEngine;
using Pixelplacement;

public class StateMachineExample : MonoBehaviour
{
	public StateMachine myStateMachine;

	void Update ()
	{
		if (Input.GetKeyDown (KeyCode.RightArrow))
		{
			GameObject currentState = myStateMachine.Next ();
			if (currentState.name == "Large")
			{
				Debug.Log ("We are at the last State in this StateMachine!");
			}
		}
	}
}
Previous
Changes to the previous state, if possible, in the StateMachine. Order is determined by placement in the hierarchy.
Example: Change a StateMachine to the previous state every time the left arrow key is pressed. When we enter the first State (which in this example is named “Small”) log a message. It is not required to set this method to a variable and is only shown here to expand upon the functionality of this method. Calling myStateMachine.Previous () works just fine.
using UnityEngine;
using Pixelplacement;

public class StateMachineExample : MonoBehaviour
{
	public StateMachine myStateMachine;

	void Update ()
	{
		if (Input.GetKeyDown (KeyCode.LeftArrow))
		{
			GameObject currentState = myStateMachine.Previous ();
			if (currentState.name == "Small")
			{
				Debug.Log ("We are at the first State in this StateMachine!");
			}
		}
	}
}
Exit
Causes a StateMachine to exit its current State which is equivalent to turning off all GameObjects and stopping any running code.
Example: Exit (shut down) a StateMachine if a user presses the Escape key.
using UnityEngine;
using Pixelplacement;

public class StateMachineExample : MonoBehaviour
{
	public StateMachine myStateMachine;

	void Update ()
	{
		if (Input.GetKeyDown (KeyCode.Escape))
		{
			myStateMachine.Exit ();
		}
	}
}
ChangeState
Changes a StateMachine to a specific State.
Example: A simple menu that extends StateMachine and changes state based on GUI buttons. Each State GameObject is named as follows in the hierarchy: SoundOptions, GraphicsOptions and ControlOptions.
using UnityEngine;
using Pixelplacement;

public class StateMachineExample : StateMachine
{
	void OnGUI ()
	{
		if (GUILayout.Button ("Sound Options"))
		{
			ChangeState ("SoundOptions");
		}

		if (GUILayout.Button ("Graphics Options"))
		{
			ChangeState ("GraphicsOptions");
		}

			if (GUILayout.Button ("Control Options"))
		{
			ChangeState ("ControlOptions");
		}
	}
}
Events
Events that can be bound to through code or the Unity inspector.
To "bind" to an event through code use the AddListener method.
using UnityEngine;
using Pixelplacement;

public class MyStateMachineEvents : MonoBehaviour
{
	public StateMachine myStateMachine;

	void Awake ()
	{
		myStateMachine.OnFirstStateEntered.AddListener (HandleFirstStateEntered);
		myStateMachine.OnLastStateEntered.AddListener (HandleLastStateEntered);
		myStateMachine.OnStateEntered.AddListener (HandleStateEntered);
	}

	void HandleFirstStateEntered ()
	{
		Debug.Log ("Hit the first state!");
	}

	void HandleLastStateEntered ()
	{
		Debug.Log ("Hit the last state!");
	}

	void HandleStateEntered (GameObject state)
	{
		Debug.Log ("Entered the " + state.name + " state!");
	}
}
State.cs
State is an optional component which can be used as-is on a StateMachine’s child GameObjects or extended for custom features. State offers in-editor development soloing functionality and enables easier control of a parent StateMachine without establishing a reference so that transitioning to a new state is greatly simplified.
ChangeState
Changes a to a specific state within the parent StateMachine.
Example: After a timer expires, transition to the TimeIsUp state within this StateMachine.
using UnityEngine;
using Pixelplacement;

public class StateExample : State
{
	float _startTime;
	float _timerDuration = 5;

	void OnEnable ()
	{
		_startTime = Time.realtimeSinceStartup;
	}

	void Update ()
	{
		if (Time.realtimeSinceStartup - _startTime > _timerDuration)
		{
			ChangeState ("TimeIsUp");
		}
	}
}
Next
Changes to the next state in this StateMachine.
Example: When a button is pressed, move to the next state in this StateMachine.
using UnityEngine;
using Pixelplacement;

public class StateExample : State
{
	void OnGUI ()
	{
		if (GUILayout.Button ("Next"))
		{
			Next ();
		}
	}
}
Previous
Changes to the previous state in this StateMachine.
Example: When a button is pressed, move to the previous state in this StateMachine.
using UnityEngine;
using Pixelplacement;

public class StateExample : State
{
	void OnGUI ()
	{
		if (GUILayout.Button ("Previous"))
		{
			Previous ();
		}
	}
}
Exit
Exits this StateMachine and shuts all States down.
Example: Exit a StateMachine and stop any running logic when a button is pressed.
using UnityEngine;
using Pixelplacement;

public class StateExample : State
{
	void OnGUI ()
	{
		if (GUILayout.Button ("Quit Gameplay"))
		{
			Exit ();
		}
	}
}